


When you’re building a content creation experience within a Content Management System (CMS), the three core elements you need to create are: handling user data, API connections, and hosting. Together, these elements can stretch you or your team to breaking point. What else could be hard? Requests to emulate an experience that’s already popular in the content creation world.
Take Medium for instance. If you’ve been tasked with creating an in-app experience that emulates Medium, you might assume that’s an easy task. But the Medium editor makes full use of features such as image upload, media embed, tables, and the horizontal line. All of these are editor features that appear simple, but have hidden costs in terms of time and will undoubtedly stretch your dev team’s knowledge of how rich text editors work.
But there is a solution.
The TinyMCE rich text editor is extremely flexible. Integrate it into your content creation app, and with just a few steps, it can achieve the UX you need (in this case, the Medium editing experience).
This article explains those customization steps.. It covers what the main requirements are to emulate, and how to customize TinyMCE to meet those demands when you’re building a CMS or similar.
Emulate the Medium editor: a working demo
The following is a demo of TinyMCE customized to bring the Medium editor experience to life. You can check the complete example on CodePen:
Key elements of Medium text editor
Emulating the Medium editor requires you to echo the following three features:
- Story prompt
- Toolbars
- Crosshair
Each of these elements plays an essential role in making the Medium editor a great UX experience. The prompt to “Tell your story…” appears inside the textarea. Everyone has a story to tell! 😀 It’s an effective method to help get people writing.
The Medium-style toolbars are minimal. Replicating that experience involves customizing the TinyMCE toolbar so that it too is minimal.
The crosshair is a symbol that appears on the left margin of the textarea. Clicking on that crosshair, which resembles a plus sign in a circle, opens a toolbar with a set of key functions for creating engaging content. More on this in the following procedures, but TinyMCE quickbars can match the crosshair’s functionality.
How to emulate the Medium editor
There are a few prerequisites to meet before setting out on the customization process:
- Knowledge of HTML and CSS
- Some knowledge of JavaScript – constants and scope
Keep these in mind as you work through the following steps.
Starting with the basic editor
If you don’t yet have your own instance of TinyMCE running, start with the default config. The following config is drawn from the TinyMCE Content Management System (CMS) solution.
- Create an HTML index file, and add HTML boilerplate.
- Include the following content inside the head section of your index.html file:
<!DOCTYPE html>
<html>
<head>
  <script src="https://cdn.tiny.cloud/1/your-api-key/tinymce/6/tinymce.min.js" referrerpolicy="origin"></script>
</head>
<body>
  <textarea>
    Welcome to TinyMCE!
  </textarea>
  <script>

    tinymce.init({
      selector: 'textarea',
      plugins: 'advlist autolink lists link image charmap preview anchor pagebreak',
      toolbar_mode: 'floating',
    });
  </script>
</body>
</html>If you’re trying out TinyMCE for the first time, sign up for a FREE API key. It gives you 14 days free access to TinyMCE Premium plugins. Using your API key in your TinyMCE config also prevents any “domain name” errors inside the text area when loading TinyMCE.
-
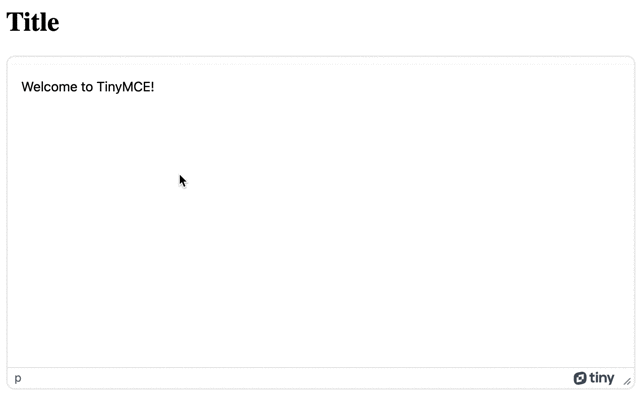
Save the changes. You now have completed the first step in emulating the Medium editor (Well done!). Open the index.html file in a browser to test out TinyMCE:

The next steps are to change the editor, customizing its appearance.
Emulating Medium with a Title and prompt
The Medium editor simplifies content creation into a title that defines the content, and the story. To achieve these two requirements, TinyMCE can be separated with JavaScript to become the title and the text area for entering the story. Here’s how:
-
Create two constants in the script tags before the tinymce.init code. These constants are the MediumStoryConfig and the MediumTitleConfig:
  <script>

   const MediumStoryConfig = {}

   const MediumTitleConfig = {}

    tinymce.init({
      selector: 'textarea',
      plugins: 'advlist autolink lists link image charmap preview anchor pagebreak',
      toolbar_mode: 'floating',
    });
</script>-
Give the two constants specific selector elements to act on. For the title constant, it is the h1 tag. For the story, an id with the value “editor”. Then set the toolbar and menubar to false.
-
Copy the plugins from the TinyMCE init script into the two constants:
  <script>
   const MediumTitleConfig = {
       selector: "h1",
       menubar: false,
       toolbar: false,
       plugins: 'advlist autolink lists link image charmap preview anchor pagebreak',

   }

   const MediumStoryConfig = {
       selector: "#editor",
       menubar: false,
       menubar: false,
       plugins: 'advlist autolink lists link image charmap preview anchor pagebreak',

   }

    tinymce.init({
      selector: 'textarea',
      toolbar_mode: 'floating',
    });
</script>-
Update the id value in the HTML to be “editor”
<body>
  <textarea id="editor">
    Welcome to TinyMCE!
  </textarea>
</body>
</html>-
Set the Title constant to inline mode with the TinyMCE inline option so it can initialize on an h1 tag:
const MediumTitleConfig = {
  selector: "h1",
  menubar: false,
  toolbar: false,
  plugins: "advlist autolink lists link image charmap preview anchor pagebreak",
  inline: true,
};
-
Add a h1 tag to the body html content to give the title an element to act on:
<body>
  <h1>Title</h1>
  <textarea id="editor">
    Welcome to TinyMCE!
  </textarea>
</body>-
Change the TinyMCE init script to initialize the two constants:
    tinymce.init({MediumTitleConfig});
    tinymce.init({MediumStoryConfig});

</script>-
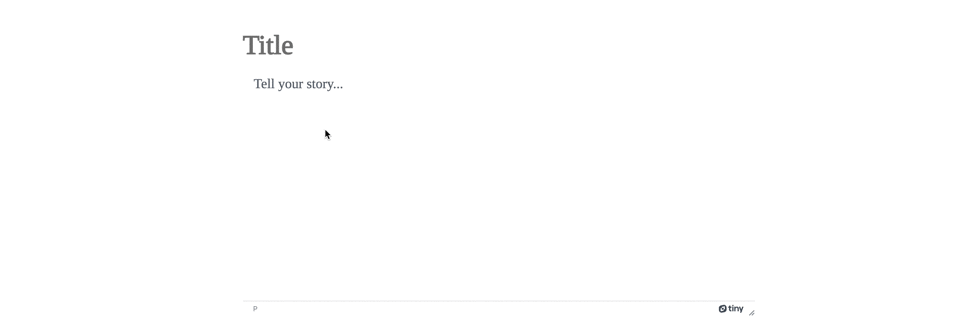
Save the changes, and check on the changed editor:
Styling the content to emulate the Medium editor
The TinyMCE editor now resembles Medium a bit more closely, at least in function, but the form and design needs work. To set this up, the next changes require adjusting the design, including the Medium prompts.
-
Add the same skin and icon configuration to both constants:
<script>
    const MediumTitleConfig = {
        selector: "h1",
        menubar: false,
        toolbar: false,
        plugins: 'advlist autolink lists link image charmap preview anchor pagebreak',
        inline: true,
        skin: "snow",
        icons: "thin",
    };

    const MediumStoryConfig = {
        selector: "#editor",
        menubar: false,
        toolbar: false,
        plugins: 'advlist autolink lists link image charmap preview anchor pagebreak',
        skin: "snow",
        icons: "thin",

    };

     tinymce.init(MediumTitleConfig);
     tinymce.init(MediumStoryConfig);

</script>-
Enable autoresize so the length of the editor window will increase automatically with content:
const MediumTitleConfig = {
  selector: "h1",
  menubar: false,
  toolbar: false,
  plugins:
    "advlist autolink lists link image charmap preview anchor pagebreak autoresize",
  inline: true,
  skin: "snow",
  icons: "thin",
};

const MediumStoryConfig = {
  selector: "#editor",
  menubar: false,
  toolbar: false,
  plugins:
    "advlist autolink lists link image charmap preview anchor pagebreak autoresize",
  skin: "snow",
  icons: "thin",
};
-
Use the content style option with a reference to the “Tinos” font to change the appearance of the words:
const MediumTitleConfig = {
  selector: "h1",
  menubar: false,
  toolbar: false,
  plugins:
    "advlist autolink lists link image charmap preview anchor pagebreak autoresize",
  inline: true,
  skin: "snow",
  icons: "thin",
  content_style:
    "@import url('https://fonts.googleapis.com/css2?family=Tinos&display=swap'); body { font-family: 'Tinos', serif; font-size: 16pt; color: #292929; }",
};

const MediumStoryConfig = {
  selector: "#editor",
  menubar: false,
  toolbar: false,
  plugins:
    "advlist autolink lists link image charmap preview anchor pagebreak autoresize",
  skin: "snow",
  icons: "thin",
  content_style:
    "@import url('https://fonts.googleapis.com/css2?family=Tinos&display=swap'); body { font-family: 'Tinos', serif; font-size: 16pt; color: #292929; }",
};
-
Use the placeholder option to add the Medium prompt to the Story constant. Also, remove the “Welcome to TinyMCE” content from between the textarea tags in the HTML body:
const MediumStoryConfig = {
  selector: "#editor",
  menubar: false,
  toolbar: false,
  plugins:
    "advlist autolink lists link image charmap preview anchor pagebreak autoresize",
  skin: "snow",
  icons: "thin",
  content_style:
    "@import url('https://fonts.googleapis.com/css2?family=Tinos&display=swap'); body { font-family: 'Tinos', serif; font-size: 16pt; color: #292929; }",
  placeholder: "Tell your story...",
};
<span style="font-family: -apple-system, BlinkMacSystemFont, 'Segoe UI', Roboto, Oxygen, Ubuntu, Cantarell, 'Open Sans', 'Helvetica Neue', sans-serif;">

</span>;
-
Save the changes, and reload the editor.
Creating the Medium-style toolbars
The form now more closely resembles the Medium content creation experience. TinyMCE quickbars offer a more streamlined alternative.
The quickbars_selection_toolbar options displays specific functions to the user when they place their cursor in the text area. Medium also has a crosshair that you can click, when starting a new line, to bring up options related to inserting content (image upload, for example). Configuring quickbars_insert_toolbar with the image, media, table, and horizontal rule plugins emulates this Medium editor function by giving the writer familiar icons right away.
-
Add the quickbars plugin to the Story constant plugin list, along with the image, media, table, and hr plugins:
plugins: 'advlist autolink lists link image media table hr charmap preview anchor pagebreak quickbars',-
include bold, italic, insert link, level one and two headers, and blockquote for the quickbars selection option in the Story constant:
tinymce.init({
  // ...
  quickbars_selection_toolbar: "bold italic link | h1 h2 | blockquote",
});
-
Include the "image media table hr" value for the quickbars insert option:
tinymce.init({
  // ...
  quickbars_insert_toolbar: "image media table hr",
});
-
Save the changes and check on the quickbars:
Emulating image upload within Medium editor
Including the image plugin as one of the quickbars insert values enables the ability to upload images within the Medium editor. To test this functionality out:
- Click inside the text area to activate the quickbar. You can also press the enter key to trigger the quickbar.
- Select the “Insert Edit Image” icon, which is the first in the quickbar
- In the dialog window that appears, set the source of the image, an alternative description, and dimensions if needed.
- Click on the save button to complete the image upload.
For more information on image upload with TinyMCE, check on the following:
- Image upload using TinyMCE and bootstrap
- Image upload with Tiny Drive
Additional customizations to Medium style editor
You can add the following HTML and CSS to the demo to further adjust and enhance the appearance of the emulated Medium style editor:
-
Add some div elements with margin and width style arguments:
<div style="margin: 20px 80px 60px 80px"></div>
<center>
    <div style="margin: 0px 80px 0px 80px; max-width: 800px;">
    <h1>Title</h1>
        <textarea id="editor"></textarea>
    </div>
</center>-
Add CSS to align and add margin style to the h1 and div tags that are the parents of the editor
h1 {
  text-align: left;
  color: grey;
  margin: 0;
}

div.editor {
  margin: 0;
}-
Save the changes.
Further customization
The editor skin can be customized with the TinyMCE premium Tiny Skins and Icon Packs. Or you can create your own TinyMCE skin using the TinyMCE skin tool. You might also find this article about TinyMCE toolbar configuration helpful.
Emulating the Medium editor for your CMS
With a rich text editor that emulates Medium, you can now see how adding TinyMCE with the Story constant and Title constant JavaScript, can save time and resources when building from scratch.
For developers, integrating TinyMCE within your own applications requires only an API Key, and knowledge of how TinyMCE can change and reshape itself to fit the required experience. Get a free API Key (including a 14 day trial of all the premium plugins) and get started within minutes.
Contact us for more information about how to upgrade your existing content platforms to take advantage of the power and simplicity provided by TinyMCE.


